
What is Bullish/Bearish Mitigation Block & How to Identify It Easily Explained. Smart Money Concepts for Beginners SMC ICT (FOREX)
- VasilyTrader

- Dec 23, 2025
- 4 min read
Bullish and Bearish Mitigation Blocks are easier to identify than you think.
In this article, I will share with you very efficient price models for the identification of Order Blocks and Mitigation Blocks.
You will learn
what is Mitigation Block,
Bullish/Bearish Mitigation Blocks examples,
how to draw Mitigation Block,
how to use Mitigation Block,
in trading Forex with Smart Money Concepts SMC ICT.
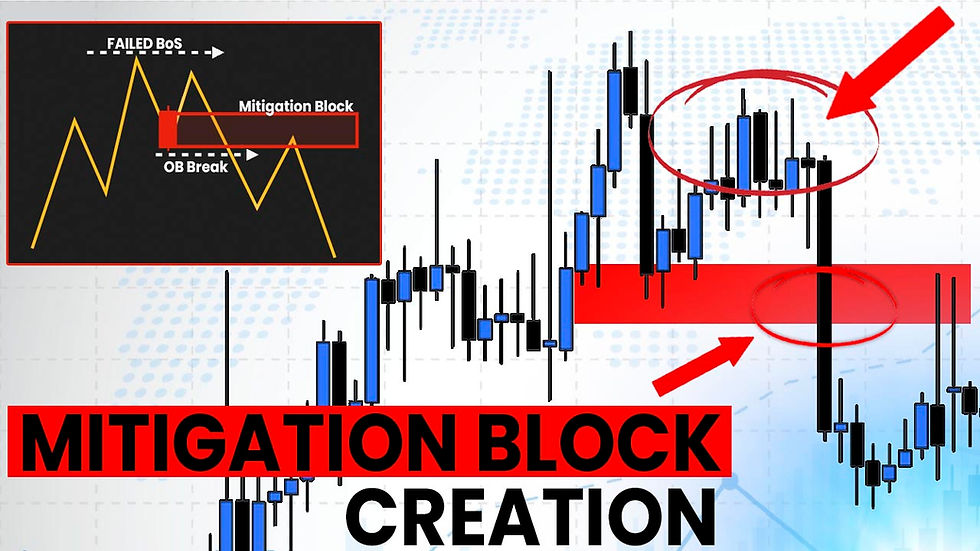
Bearish Mitigation Block Model
Let's start with a theory and study Bullish Trend Model & Bearish Mitigation Block Formation.
Please, examine a following price model:

In Smart Money Concepts trading, a bullish price structure is based on a consistent formation of new Higher Highs and Higher Lows.
Such a price model will be used to confirm an uptrend.
The zone based on the last Higher Low in that will compose a Bullish Order Block Zone - the area from where the last bullish impulse initiated.
I will explain how to draw that zone in the examples below.
Bullish Order Block will be confirmed after a violation of a current high - a Break of Structure BoS and a formation of a new Higher High.
In some instances, a bullish wave that initiates from a potential Order Block Zone will FAIL to break a current structure high and will set a Lower High.
A consequent bearish movement and a breakout of an identified Order Block zone will confirm a formation of a Bearish Mitigation Block.
A formation of a Bearish Mitigation Block will be an important event that will signify 2 things:
a violation of a current uptrend,
a market structure shift and a start of a new bearish trend.
A Bearish Mitigation Block zone will be applied as the area to sell from.
Probabilities will be high that a strong bearish movement will follow after its test.
Test of Supply Zone
Such a market structure shift is not a random event.
One of the most reliable things that can help you to confirm a coming violation of an uptrend is a test of a significant liquidity supply zone.

The market may reach a supply zone and initiate a bearish reversal zone, or form a bullish trap and a liquidity sweep first.
Both scenarios are acceptable.
Bearish Mitigation Block Example
Here is an example of a formation of a bearish Mitigation Block on GBPUSD forex pair.

The pair was in a bullish structure and reached a historic supply zone.
After its test, the price retraced and formed a potential Bullish Order Block Zone from where a new bullish wave started.
Drawing that zone, I took the level of the last Higher Low and the low of the body of that candlestick.
The price did not manage to update the high and set a Lower High instead.
With a consequent bearish movement, the underlined Bullish Order Block Zone was broken.
A formation of a new lower low lower close confirmed a bearish market structure shift.
Bullish Order Block Zone turned into a Bearish Mitigation Block - the zone from where the next bearish wave started.
Bullish Mitigation Block Model
Now, let's examine a Bearish Trend Model and Bullish Mitigation Block Formation.

In Smart Money Concepts trading, a bearish price structure is based on a consistent formation of new Lower Lows and Lower High.
Such a price model will be used to confirm a downtrend.
The zone based on the last Lower High in that will compose a Bearish Order Block Zone - the area from where the last bearish impulse initiated.
Bearish Order Block will be confirmed after a violation of a current low - a Bearish Break of Structure BoS and a formation of a new Lower Low.
In some instances, a bearish wave that initiates from a potential Order Block Zone will FAIL to break a current structure low and will set a Higher Low.
A consequent bullish movement and a breakout of an identified Order Block zone will confirm a formation of a Bullish Mitigation Block.
A formation of a Bullish Mitigation Block will be an important event that will signify 2 things:
a violation of a current downtrend,
a market structure shift and a start of a new bullish trend.
A Bullish Mitigation Block zone will be applied as the area to buy from.
Probabilities will be high that a strong bullish movement will follow after its test.
Test of Demand Zone
Such a market structure shift is not a random event.
One of the most reliable things that can help you to confirm a coming violation of a downtrend is a test of a significant liquidity demand zone.

The market may reach a demand zone and initiate a bullish reversal zone, or form a bearish trap and a liquidity sweep first.
Both scenarios are acceptable.
Bullish Mitigation Block Example
Here is an example of a formation of a bullish Mitigation Block on USDJPY forex pair.

The pair was in a bearish structure and reached a historic demand zone.
After its test, the price pulled back and formed a potential Bearish Order Block Zone from where a new selling wave started.
Drawing that zone, I took the level of the last Lower High and the high of the body of that candlestick.
The price did not manage to update the low and set a Higher Low instead.
With a consequent bullish movement, the underlined Bearish Order Block Zone was broken.
A formation of a new higher high higher close confirmed a bullish market structure shift.
Bearish Order Block Zone turned into a Bullish Mitigation Block - the zone from where the next bullish wave started.
Potential Manipulations
Please, also not, that testing a Bullish Mitigation block there was a liquidity grab and a bearish trap below that.
Smart Money will often manipulate the market, hunting your stop loss before an expected price movement begins.
The Takeaway
A proper combination of structure mapping and liquidity analysis will help you to predict a market structure shirt and a mitigation block creation in a bullish and bearish trend before they happen.
The models that I shared will help you to confirm bullish and bearish breaker Mitigation Blocks trading Forex or any other markets with Smart Money Concepts SMC ICT.


